Next up, you are going to create your own trading card. It can be for yourself, your favourite hockey player, athlete, Pokemon, super hero, Teletubby, technology teacher, or anything, really!
Be CREATIVE and HAVE FUN!
You will use a lot of the skills that you learned in creating your timetable, so I WILL NOT show you this one step-by-step! There are a couple of new things that I will show you, but otherwise, you’re on your own.
Here’s my fabulous example:
Note that at the bottom, there’s a TABLE with some statistics. The left column is aligned on the left, the middle one is in the centre, and the right one is on the right. The borders are invisible.
With the borders, it looks like this:
You will have to use most of the skills you learned in the previous assignment:
- Save your file in the correct spot as Trading Card.docx
- I did not change my layout but I did change my margins to narrow
- The blue & black background is a Shape:

I used a rectangle with rounded corners, but choose whatever works best for you. Consider using more than one shape if you like!
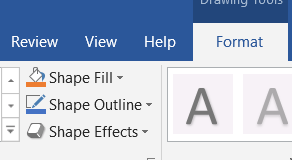
You can change the colour of your shape with “Shape Fill” and the border around it with “Shape Outline”
Then ALL of my writing is in Text Boxes (much easier to move around!)
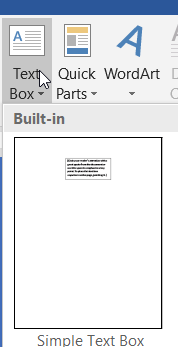
Under Insert, choose Text Box, and Simple Text Box
Draw it wherever you want on your page. I used THREE of them (one for the title, one for the biography, and one for the statistics table.)
Text boxes can/should also have a Fill and an Outline!
Then back to skills that you already know:
- Change fonts, sizes, and colours
- Properly centre text (and in your table, put the right column on the right)
- Add a picture (those can/should have a border too!)
- Table at the bottom with statistics. Make it at least 3 columns and 2 rows. Your statistics could include things like height, weight, superpower, teams played for, awards won, favourite food, or whatever you want, really. Make a heading row (and make those headings bold, underlined, or a different colour so that they stand out!)


